Showing posts with label Faux Bone™. Show all posts

Sunday, August 4, 2013

Ring Pendant


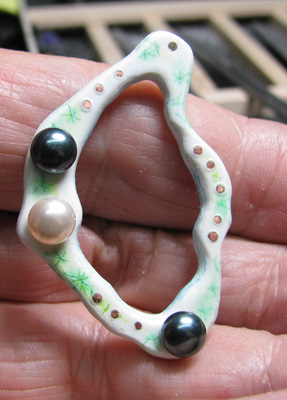
This piece went through a lot of different modifications before I settled on this version.  Faux Bone, Swarovski Crystal Pearl cabochon twenty gauge copper wire, balled and wrapped, alcohol ink.

I've done something to my dominate hand and wrist so I don't know if I can complete anything by next weekend.  When you get old things happen that you don't have a clue as to how they happened, they just do.


Sunday, July 7, 2013

Faux Bone Pendant


A Faux Bone pendant.  The purple field looked pretty good a first, but I decided that it needed some help.  I put a half-drilled  Swarovski cabochon pearl in the field and that improved the appearance.  I also added a few brush strokes of pearl.  Whether that was a good idea, I don't know.  Maybe yes, maybe no.


Lighting conditions certainly not the same.

I don't know why, but I sort of like the half-drilled pearls.  Of course, these are not real pearls.  They only have the appearance of a pearl.  And, they come in a variety of colors.  Hard to find, though.

 I use this method to fasten the pearl.  First, I ball the end of a short piece of 20 gauge copper wire. I don't bother to pickle or remove any fire scale.  It's all going to be hidden anyway, except on the backside of the piece and that will be taken care of later.

Next, I insert the wire into a riveting block, that funny looking hexagonal steel block with different sized holes and slots, and hammer down the balled end, flattening it into a nail head rivet.

After removing the rivet from the block, I file the head to make it thinner, and it brightens up the end.

Then, drill a hole in the Faux Bone where the pearl will go, and chamfer the outside part of the hole with the point of a triangular scraper.  This because under the rivet head there will most likely be a tapered portion, left over from the original ball. Chamfering make a tapered opening and the rivet will sit flat against the back.

I file the other end of the rivet to remove any bur and actually file a bit of a sharp point so the wire will easily go through the hole, place the piece on the bench block and tap the rivet head flat on the back.

Having previously tested the hole depth in the pearl (1/8"),  I clip the wire to that length, file the end a bit, and put one tiny drop of Zap-a-Gap adhesive on the wire and quickly pop the pearl on wire, and let dry.  Although this adhesive sets up very quickly, I let it dry for 24 hours before continuing to work on the piece.  

Next week's blog entry will detail the process of making a bail for the stringing and a different sort of pendant, my magnificent (ha ha) segmented pendant!  I just know you can't bear to wait for it.  Chuckle, chuckle.


Sunday, November 13, 2011

What I am working on.....

Lots of mistakes made on this piece.  The horrid clasp is only temporary.  I'm coloring the Faux Bone™ with acrylic paint and Gilder's Paste.  When that's done, with the pieces cleaned up, I'll put a couple coats of Renaissance wax on them  Then put it all together and hope for the best!

The bit of screen doesn't belong to this piece.

Gilder's Paste is kind of neat stuff.  Best if slightly diluted with mineral spirits.  I used Iris Blue on the back side of the bone, and on the edges.  There's more left to do there.  The acrylic is also slightly diluted, but with water.  I can see some areas that need a bit color.  Slow process.

Anyway, thanks for looking.

Sunday, August 14, 2011

Old, Dry, Cracked Bones

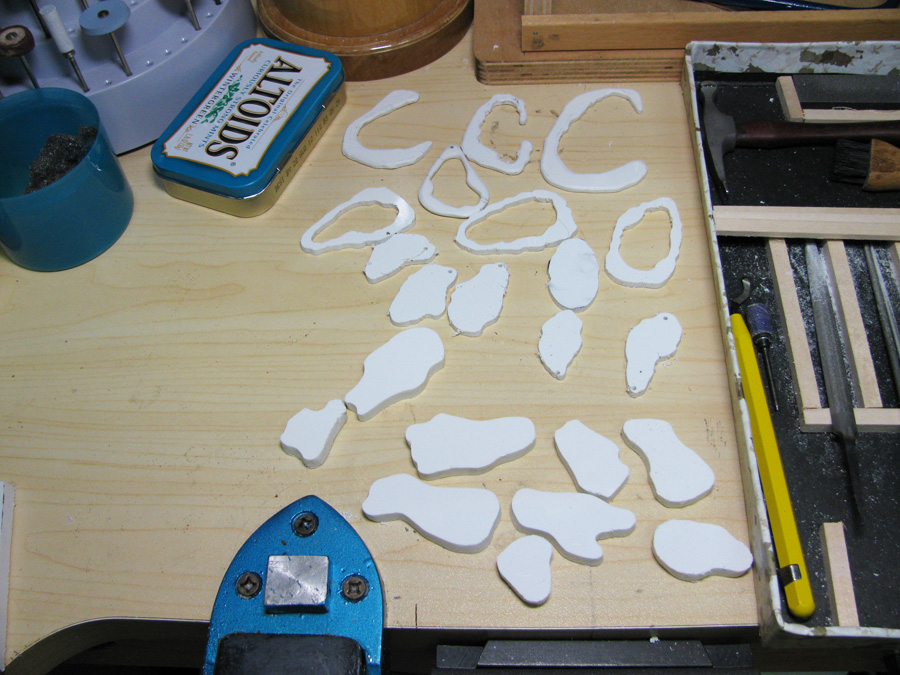
Previous post showed some cut out pieces of Faux Bone™ on the bench top.  After hacking away on them during the week, below is the result.

Brown shoe polish for color, some wood beads and some of the heat treated copper jump rings and tube spacers.  Strung on Greek leather cord. Marks cut in with a single edge razor blade.  I have more control with this type of blade than the common craft knife.

A note to regular visitors. I'm taking some time off from posting.  Thanks for visiting.


Sunday, August 7, 2011

HEAT TREATED COPPER PIECES and CUT FAUX BONE PIECES

The pieces in the photo were heated in an oven at 350ยบ (F) for 20 minutes.  It demonstrates that you can get some strange color on copper.  Some turn silvery, others gold, and some with the red metallic color.  These are just a few of hundreds of pieces.  You just never know what will pop up.


Some Faux Bone pieces, cut, partially finish with the filing, more to be done.  Last of the Atoll series in back.  New Island pieces in center, saved cut-outs from the pieces in back, and free form pieces in front, all nine to eventually go on a necklace.  Haven't a clue how they will be finished.  I will just wing it as usual.

Missfickle beads have arrived from the good folks at Lima Beads.  They are fantastic!

Stay well, make good stuff, and thanks for looking.

Some folks have to have music.  I have to have Altoids, and the tins make good storage boxes.

Thursday, July 28, 2011

Atoll No. 3

Another Atoll pendant, unfinished as usual.  This time because I need to order some Missfickle beads from Lima Beads.  Nice people there, at Lima Beads.  I think those special patinated beads will work quite well, along with some heat treated copper spacers and jump rings. It will be strung on greek leather cord.

Fux Bone™, brass and copper rivets.  Color, green acrylic paint, Iris blue Gilder's paste. Stone is ocean jasper, suspended from copper wire.

I guess I have some sort of passion for the South Pacific atolls.  No two are alike, and many have unique fauna found no where else.

Friday, July 1, 2011

Atoll No. 2

Atoll No. 2 partially finished.

Faux Bone™, Swarovski crystal pearls, creamrose and tahitian-look, copper wire rivets, palm trees scored in with X-acto knife, colored with green acrylic paint and light blue Prismacolor pencil on the interior and exterior.

Last posting for awhile, be sometime next week.

Thanks for your continued viewing.

Thursday, June 30, 2011

Atoll No. 1

Start of a new series.

Faux Bone™, swarovski crystals, copper and brass rivets, copper wire, blue and green acrylic paint.  Eventually, I'll hang it from some Greek cord.

Thursday, June 16, 2011

Organic 3

Faux Bone™ Sawn, shaped, inlay of plumber's epoxy putty, textured, colored with burnt sienna acrylic paint, Renaissance Wax.

Saturday, June 11, 2011

Organic 2, Complete


Upper photo shows the piece after heating and domed in a wood dapping block.


The completed piece with texture and color, Burnt Sienna Acrylic.

Hope you like it!

Friday, June 10, 2011

Organic 2, partial

Organic 2.  Holes sawn and drilled, partially shaped by filing. Rivets installed.  As you can see, there's still a lot of little crumbs which need to be removed.  I may still add some more small holes.

Next step will probably be to heat the material and shape into a shallow dome.  Then add texture and color.

Thursday, March 24, 2011

Beachcombing (in progress) phase 3

Two more components to be added to the mix, which will eventually become a necklace.  Both pieces were heated and then formed.  The starfish measures about 7/8s inch across.